一、概述
这边文章主要讲一下MSDK如何去显示飞机的图传流程和实现基础的拍照录像等功能
代码链接:https://www.github.com/DJI-Mobile-SDK-Tutorials/Android-FPVDemo
文章链接:https://developer.dji.com/mobile-sdk/documentation/android-tutorials/index.html
二、代码
安装SDK代码:MApplication.java
注册App和连接飞机代码:ConnectionActivity.java、FPVDemoApplication.java
安装SDK,注册,连接飞机等相关代码和上篇MSDK -- Android-ImportAndActivateSDKInAndroidStudio代码跟读文章过程基本类似,这边不再做重复解读。
实现UI初始化界面,整个实时图传的获取基础设置,拍照、录像功能切换,拍照和录制功能使用。
UI初始化界面:
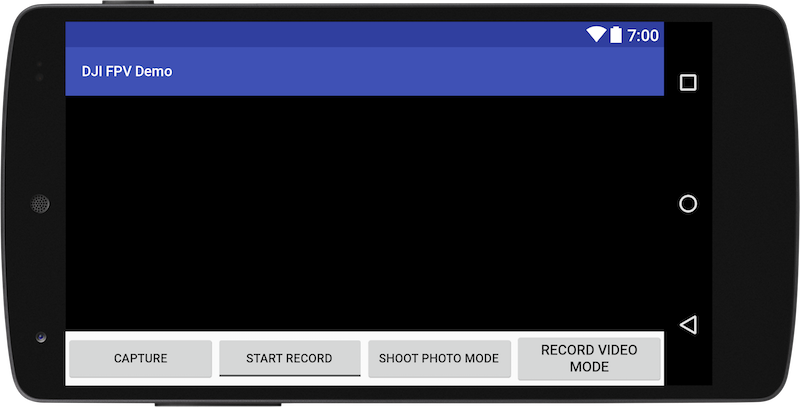
使用了R.layout.activity_main布局,其中R.layout.activity_main中,实现了一个TextureView用来显示图传画面,一些按钮用于实现拍照,录像,模式切换等功能。
@Override
protected void onCreate(Bundle savedInstanceState) {

super.onCreate(savedInstanceState);
setContentView(R.layout.activity_main);

...

initUI();

...

}
图传显示:
<TextureView
android:id="@+id/video_previewer_surface"
android:layout_width="match_parent"
android:layout_height="match_parent"
android:layout_gravity="center"
android:layout_centerHorizontal="true"
android:layout_above="@+id/linearLayout" />
一些按钮功能布局:
<LinearLayout
android:layout_width="match_parent"
android:layout_height="wrap_content"
android:orientation="horizontal"
android:layout_alignParentBottom="true"
android:id="@+id/linearLayout">
<Button
android:id="@+id/btn_capture"
android:layout_width="0dp"
android:layout_weight="1"
android:layout_gravity="center_vertical"
android:layout_height="wrap_content"
android:text="Capture"
android:textSize="12sp"/>

<ToggleButton
android:id="@+id/btn_record"
android:layout_width="0dp"
android:layout_height="wrap_content"
android:text="Start Record"
android:textOff="Start Record"
android:textOn="Stop Record"
android:layout_weight="1"
android:layout_gravity="center_vertical"
android:textSize="12dp"
android:checked="false" />

<Button
android:id="@+id/btn_shoot_photo_mode"
android:layout_width="0dp"
android:layout_weight="1"
android:layout_height="wrap_content"
android:layout_gravity="center_vertical"
android:text="Shoot Photo Mode"
android:textSize="12sp"/>

<Button
android:id="@+id/btn_record_video_mode"
android:layout_width="0dp"
android:layout_height="wrap_content"
android:text="Record Video Mode"
android:layout_weight="1"
android:layout_gravity="center_vertical" />

</LinearLayout>
基本UI部件逻辑绑定:
private void initUI() {
// init mVideoSurface
mVideoSurface = (TextureView)findViewById(R.id.video_previewer_surface);

recordingTime = (TextView) findViewById(R.id.timer);
mCaptureBtn = (Button) findViewById(R.id.btn_capture);
mRecordBtn = (ToggleButton) findViewById(R.id.btn_record);
mShootPhotoModeBtn = (Button) findViewById(R.id.btn_shoot_photo_mode);
mRecordVideoModeBtn = (Button) findViewById(R.id.btn_record_video_mode);

if (null != mVideoSurface) {
mVideoSurface.setSurfaceTextureListener(this);
}

mCaptureBtn.setOnClickListener(this);
mRecordBtn.setOnClickListener(this);
mShootPhotoModeBtn.setOnClickListener(this);
mRecordVideoModeBtn.setOnClickListener(this);

recordingTime.setVisibility(View.INVISIBLE);

mRecordBtn.setOnCheckedChangeListener(new CompoundButton.OnCheckedChangeListener() {
@Override
public void onCheckedChanged(CompoundButton buttonView, boolean isChecked) {
if (isChecked) {
startRecord();
} else {
stopRecord();
}
}
});
}

图传初始化显示:
首先,进行解码器的创建工作,通过mCodecManager = new DJICodecManager(this, surface, width, height);语句将解码器创建,并绑定需要显示的surface、宽高等,当surface销毁则清除绑定关系并置空操作,相关代码如下:
@Override
public void onSurfaceTextureAvailable(SurfaceTexture surface, int width, int height) {
Log.e(TAG, "onSurfaceTextureAvailable");
if (mCodecManager == null) {
mCodecManager = new DJICodecManager(this, surface, width, height);
}
}

@Override
public void onSurfaceTextureSizeChanged(SurfaceTexture surface, int width, int height) {
Log.e(TAG, "onSurfaceTextureSizeChanged");
}

@Override
public boolean onSurfaceTextureDestroyed(SurfaceTexture surface) {
Log.e(TAG,"onSurfaceTextureDestroyed");
if (mCodecManager != null) {
mCodecManager.cleanSurface();
mCodecManager = null;
}

return false;
}

@Override
public void onSurfaceTextureUpdated(SurfaceTexture surface) {
}
然后,对于连入的飞机设置数据监听回调,并在回调中处理数据解码:
检查产品设备是否连接,如果连接了则绑定SurfaceTextureListener监听器,通过VideoFeeder.getInstance().getPrimaryVideoFeed().addVideoDataListener(mReceivedVideoDataListener);去将图传数据监听器进行绑定,便于后续处理图传数据。
private void initPreviewer() {

BaseProduct product = FPVDemoApplication.getProductInstance();

if (product == null || !product.isConnected()) {
showToast(getString(R.string.disconnected));
} else {
if (null != mVideoSurface) {
mVideoSurface.setSurfaceTextureListener(this);
}
if (!product.getModel().equals(Model.UNKNOWN_AIRCRAFT)) {
VideoFeeder.getInstance().getPrimaryVideoFeed().addVideoDataListener(mReceivedVideoDataListener);
}
}
}

...

}
mReceivedVideoDataListener即是作为图传数据处理的监听器,监听回调内部将接受到的H264数据发送给了解码器进行解码处理:mCodecManager.sendDataToDecoder(videoBuffer, size);
protected VideoFeeder.VideoDataListener mReceivedVideoDataListener = null;
// The callback for receiving the raw H264 video data for camera live view
mReceivedVideoDataListener = new VideoFeeder.VideoDataListener() {

@Override
public void onReceive(byte[] videoBuffer, int size) {
if (mCodecManager != null) {
mCodecManager.sendDataToDecoder(videoBuffer, size);
}
}
};
解码处理完毕则会在TextureView显示出解码后图像,整个解码显示过程到此结束。
拍照、录像、切换相机模式的相关绑定:
@Override
public void onClick(View v) {

switch (v.getId()) {
case R.id.btn_capture:{
captureAction();
break;
}
case R.id.btn_shoot_photo_mode:{
switchCameraMode(SettingsDefinitions.CameraMode.SHOOT_PHOTO);
break;
}
case R.id.btn_record_video_mode:{
switchCameraMode(SettingsDefinitions.CameraMode.RECORD_VIDEO);
break;
}
default:
break;
}
}
拍照功能captureAction();通过相机实例的setShootPhotoMode方法,设置为单拍模式SettingsDefinitions.ShootPhotoMode.SINGLE,如果设置成功则进行startShootPhoto方法拍照,并根据拍照结果给出相关toast提示告知客户。
// Method for taking photo
private void captureAction(){

final Camera camera = FPVDemoApplication.getCameraInstance();
if (camera != null) {

SettingsDefinitions.ShootPhotoMode photoMode = SettingsDefinitions.ShootPhotoMode.SINGLE; // Set the camera capture mode as Single mode
camera.setShootPhotoMode(photoMode, new CommonCallbacks.CompletionCallback(){
@Override
public void onResult(DJIError djiError) {
if (null == djiError) {
handler.postDelayed(new Runnable() {
@Override
public void run() {
camera.startShootPhoto(new CommonCallbacks.CompletionCallback() {
@Override
public void onResult(DJIError djiError) {
if (djiError == null) {
showToast("take photo: success");
} else {
showToast(djiError.getDescription());
}
}
});
}
}, 2000);
}
}
});
}
}
切换拍照、录像模式:
通过方法并根据传输进来的具体SettingsDefinitions.CameraMode模式,SHOOT_PHOTO/RECORD_VIDEO选择进行设置相机模式setMode,并将结果通过toast反馈给客户。
private void switchCameraMode(SettingsDefinitions.CameraMode cameraMode){

Camera camera = FPVDemoApplication.getCameraInstance();
if (camera != null) {
camera.setMode(cameraMode, new CommonCallbacks.CompletionCallback() {
@Override
public void onResult(DJIError error) {

if (error == null) {
showToast("Switch Camera Mode Succeeded");
} else {
showToast(error.getDescription());
}
}
});
}
}
录像功能:
按键功能绑定,通过一个翻转按钮组件实现开始和停止录像:
 mRecordBtn.setOnCheckedChangeListener(new CompoundButton.OnCheckedChangeListener() {
@Override
public void onCheckedChanged(CompoundButton buttonView, boolean isChecked) {
if (isChecked) {
startRecord();
} else {
stopRecord();
}
}
});
开始拍照startRecord,从相机实例中调用startRecordVideo进行拍照功能,并将结果通过toast告知客户:
// Method for starting recording
private void startRecord(){

final Camera camera = FPVDemoApplication.getCameraInstance();
if (camera != null) {
camera.startRecordVideo(new CommonCallbacks.CompletionCallback(){
@Override
public void onResult(DJIError djiError)
{
if (djiError == null) {
showToast("Record video: success");
}else {
showToast(djiError.getDescription());
}
}
}); // Execute the startRecordVideo API
}
}
停止拍照功能stopRecord,从相机实例中调用stopRecordVideo进行拍照功能,并将结果通过toast告知客户:
// Method for stopping recording
private void stopRecord(){

Camera camera = FPVDemoApplication.getCameraInstance();
if (camera != null) {
camera.stopRecordVideo(new CommonCallbacks.CompletionCallback(){

@Override
public void onResult(DJIError djiError)
{
if(djiError == null) {
showToast("Stop recording: success");
}else {
showToast(djiError.getDescription());
}
}
}); // Execute the stopRecordVideo API
}

}
代码还实现了一个记录录制时间的功能,具体通过相机系统状态监听cameraSystemState下的getCurrentVideoRecordingTimeInSeconds当前录制时间长度,并实时更新在recordingTime的TextView文本中,相关代码:
if (camera != null) {

camera.setSystemStateCallback(new SystemState.Callback() {
@Override
public void onUpdate(SystemState cameraSystemState) {
if (null != cameraSystemState) {

int recordTime = cameraSystemState.getCurrentVideoRecordingTimeInSeconds();
int minutes = (recordTime % 3600) / 60;
int seconds = recordTime % 60;

final String timeString = String.format("%02d:%02d", minutes, seconds);
final boolean isVideoRecording = cameraSystemState.isRecording();

MainActivity.this.runOnUiThread(new Runnable() {

@Override
public void run() {

recordingTime.setText(timeString);

/*
* Update recordingTime TextView visibility and mRecordBtn's check state
*/
if (isVideoRecording){
recordingTime.setVisibility(View.VISIBLE);
}else
{
recordingTime.setVisibility(View.INVISIBLE);
}
}
});
}
}
到此,整个代码分析逻辑完毕。
评论
0 条评论
请登录写评论。